Sunday, August 19, 2018

Country Style Pork Ribs

One thing I love is BBQ Ribs, any style, any type meat.  I want to share a recipe with you for the Country Style Ribs I developed.

Seasoned country pork ribs
Step 1: Season your raw product well.  I use salt, pepper, garlic powder and my own blend of BBQ rub. You can use any premixed BBQ seasoning currently available in the spice isle, but I prefer my own.

Season both sides and give it a little rub to get it in the meat.  Place in a pan with sides touching.

Topped and ready to go
Step 2: Add thinly sliced onion to the top of the meat. (See above photo)  On top of the onion, layer canned tomatoes.  I usually use Rotel Diced Tomatoes w/ Green Chilies, but I did not have any today.  I had a can of stewed tomatoes in the cubbard, so that is what I used. To off-set the sweetness of the stewed tomatoes, I added some sliced jalapeno peppers for some zing. Add salt, pepper and powdered garlic to the top.  Give it a drink of beer to help steam in some yumm~e tenderness. If beer offends you, just add plain water to the bottom of the pan

Step 3: Cover with plastic wrap, then foil and cook on 350F for 2 hours. After cooking, remove from oven and carefully remove the wrap and foil.  (Steam will escape, so be careful to avoid getting burned.) Remove the toppings and set aside for later. It  makes and excellent side dish. Add your favorite BBQ sauce to the top of the meat and put back in the oven for 1/2 hour.  I usually like to finish them off at this point on the grill, but did not have one available today.

After 2 hours
Remove toppings and reserve


Yumm~e ness!
Step 4: After 1/2 hour, turn on your broiler and let the sauce caramelize on top of the meat.   This will only take a few minutes, so don't walk away.
Plated and ready to devour
I hope everyone enjoys this recipe.  Don't forget to throw a side of cole slaw in there also. Or some corn on the cob! Potato salad. Macaroni salad. Baked beans. The options are endless. And Yumm~e!

Saturday, July 14, 2012

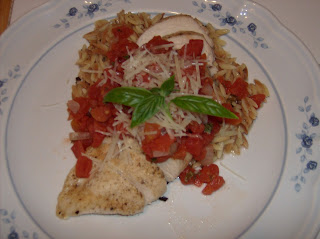
Bruschetta Style Chicken with Garlic-Basil Orzo

This is a  light meal, full of flavor and very satisfying. 

Roasted Chicken
4  6-oz boneless, skinless chicken breasts
1 tablespoon olive or canola oil
Granulated garlic
Rubbed sage
Sea salt & Pepper

Arrange chicken on roasting pan.  Brush with oil and season with herbs.  Roast in oven for 30 minutes at 350F.  Check to be sure chicken is cooked through.  If additional time is needed, reduce heat to 300 and bake another 15 minutes.

Bruschetta Sauce
2 14-oz cans petitie diced tomatoes
1/4 teaspoon olive or canola oil
1/2 small onion, chopped
1 tablespoon fresh basil coarse chopped.
2 cloves garlic, chopped or 2 teaspoon chopped wet garlic (available in cooler section of grocery store)
Sea salt & Pepper, to taste

Put oil and onions in a medium saucepan and saute onions until tender.  Add the remaining ingredients to saucepan and simmer on low heat for half hour, stirring occasionally. 

Orzo
1 cup orzo
1 1/2 cup water
1 chicken bouillion cube
granulated garlic
fresh chopped basil

In a suate pan, over low heat. lightly toast the orzo.  Stir occasionally to evenly toast.  Turn heat to medium high and add water and bouillion cube.  Cover and simmer for 5 minutes, stirring occationally.  Reduce heat to medium and add garlic and basil and simmer 3 more minutes.  Cover and remove from heat until ready to serve.

Plate
Portion out orzo on plate.  Slice breast of chicken and arrange on top of orzo.  Top with Bruschetta Sauce and sprinkle with shredded Parmesan cheese.  Enjoy.


Thursday, February 11, 2010

Make Everyday Look Spectacular

Sometimes we get so tied up with our everyday responsibilities, we forget to take the time to create a nice looking, as well as, appetizing meal. It is very easy to just throw the food to the wolves and let them devour it, instead of pleasing the eye also. Simple touches will do the trick.  Some chopped herbs over the top, or a fresh sprig tucked on the side of the plate.

Today I had a salad for my lunch. And as I was chopping and placing the items on the plate, I automatically began arranging them in an appealing way. This is a habit picked up from my many years in the professional kitchen. Remember, you taste the food first with the eyes. Anyway, back to my salad. It was just a plain garden salad, but I wanted it to be pretty before I tore into it. Sort of foreplay for the taste buds. He! He!

I did manage to snap a picture before diving into it.  I love a diversity of flavors in a salad and just a hint of dressing. I don't have any dressing on it at this point, as all I had in the house today was ranch. Having that globed on the top would have taken away from the raw beauty of the vegetables.


There really is some lettuce under all that.  I got carried away because just about everything in the refrigerator that could go on it, really looked good.  I was going to type as I ate, but it was so good, I didn't want to put my fork down.

Occasionally, try to give your food some pizazz and just take a little extra time with placement.  And don't let it get to you if your family teases you.  If it makes you smile, that's all that matters.  So, keep cooking and keep smiling!

Tuesday, May 12, 2009

Stretching Your Dollar-Ramen Noodle Style

In today's economy, you have to make every dollar you have go as far as you can. Especially if you are a college student or on your own for the first time. One thing that college students seem to live on these days is Ramen noodles. They come in a variety of flavors already, but after awhile, I think they would become tedious and boring.

Being a chef, I always try to think of ideas to improve on and revitalize an old dish. I looked over some ideas and come up with some yummy ideas that could turn a boring Ramen noodle meal into an interesting experience. Here are a couple to try this week.


Beef 'n Broccoli


Beef flavored Ramen noodles
1/2 cup cubed or strips of cooked beef
1 cup cut frozen broccoli
1 stem spring onion, chopped
1/4 teaspoon garlic powder
1/8 teaspoon ground black pepper
Soy sauce to taste

Cook noodles as directed, except leave the seasoning packet out. Drain most of the water from the noodles. Add the beef, broccoli, season packet, garlic, and pepper. Stir together. Transfer to a bowl and sprinkle chopped spring onion on top. Season with soy sauce to taste.


Taco Ramen


Beef flavored Ramen noodles
1/2 pound cooked ground beef
1/8 teaspoon chili powder
1 small Roma tomato, chopped
1 stem spring onion, chopped
1/2 cup shredded cheese
Taco sauce
Sour cream

Cook noodles as directed, except leave the seasoning packet out. Drain most of the water form the noodles. Add the seasoning packet, cooked drained ground beef, and chili powder. Transfer to a bowl and top with chopped tomato and spring onion, shredded cheese, taco sauce and sour cream. Add a few tortilla chips for some crunch, if desired.

Tuesday, April 21, 2009

Roux

A roux is a simple combination of two ingredients that makes your life so much easier in the kitchen when thickening soups, sauces and gravies; just to name a few. To make a roux is very easy, like I said, it is only two ingredients.

Take unsalted butter and melt down on low heat. Drain off the clarified butter on the top and discard the milk fats that have collected on the bottom. In a heavy sauce pan, on medium heat, add the clarified butter and equal amounts of plain flour. Heat the mixture until it begins to put off a slightly nutty aroma. Remove from heat and store in a container until needed. You can store it in a cool dark area, or if you have made a large amount, store in the refrigerator.

The importance of using plain flour is not evident when you make the initial product. However, depending on what you are adding it to can be very important. You do not want to use self rising flour because it already has baking powder and salt added. The baking powder is the major reason you do not want to use self rising flour for roux, as it could cause a rapid boil over when added to a product and ruin what you are cooking and potentially burn you.

When using roux, just add small pieces, about the size of a pad of butter, until you get the desired thickness. Have your product on medium high heat and stir in with a whisk. Remember, the sauce will thicken more as it cools.

Chicken Cordon Bleu

This is a classic French dish simplified. Good food does not necessarily mean complicated food.

Chicken Cordon Bleu


4 boneless chicken breasts, pounded flat
8 slices Swiss cheese
8 slices deli ham
8 spears fresh asparagus (optional)
1 cup seasoned breadcrumbs
¼ cup melted butter
Sea salt and pepper to taste

Pound out the chicken breasts until equal thickness through out, using a meat mallet. Lay breasts with inside facing up. (Determining the inside and outside of the breast is easy. The outside is smooth, and the inside you can see the muscle tissue.) Layer Swiss cheese, deli ham, and asparagus across short part of the meat. Grasping one end of breast, tightly roll it up and secure with a toothpick. Lay seam side down in a baking dish sprayed with pan release.

Season with salt and pepper. Mix breadcrumbs and butter together and evenly sprinkle on top of breasts. Bake at 350F for 20 minutes and breadcrumbs are golden brown.

Serve over wild rice with a White Basil Sauce.


White Basil Sauce

In a saucepan, combine 1 tablespoon butter, 1 teaspoon chopped garlic, 1 tablespoon chopped fresh basil, sea salt and pepper to taste. Bring up to medium heat and stir to keep from burning. Once hot, add 1 pint heavy whipping cream. Bring back up to heat, until you get a gentle rolling boil. Allow to reduce slightly and thicken with a pinch of roux. Roux (pronounced roué) is melted clarified butter heated with a little plain flour and made into a paste. Remember, sauce will thicken more once it cools some. If it is too thick, just add a little more cream or milk.

Serve over Chicken Cordon Bleu.

Sunday, March 1, 2009

Passion For A Sandwich

One thing I love is a good sandwich. Not just any lunch meat sandwich, but a combination of delicious ingredients that tantalize the mouth and make the tummy happy. Gently toasted and full of good stuff. The toasting makes the sandwich. Use whatever you have to; George Foreman type grill, an electric griddle, or your faithful cast iron skillet. I like to slightly warm most of the ingredients so when I bite in, it’s hot all the way through and satisfying to the senses.

Just about anything that can be combined on a plate, can be placed between two slices of bread. Remember that turkey sandwich at Thanksgiving? Sliced turkey, a little stuffing, cranberry sauce, and replace the mayo with some mashed potatoes, all toasted and served with a side of gravy for dipping. YUMMY!!!! Or turkey and warm apples with sautéed onions and craisins. These are the types of combinations I love to create. My boyfriend even loves a Spaghetti sandwich. Go figure.

So here are a few of my favorites I want to share. May you enjoy them as much as I do.


Cuban Press

Roast pork loin, thin sliced
Deli ham, sliced
Swiss cheese, sliced
Dill pickles, sandwich sliced
Spicy mustard
French bread, diagonally cut
A little melted butter

Take you French bread and cut on an extreme diagonal. Cover each slice with some spicy mustard on the inside and brush lightly with the melted butter on the outside. Layer the pork loin, ham, Swiss cheese, and pickles between the bread. Place it in your grill and close the lid so the sandwich is “pressed”. If you are using a griddle or cast iron pan, place weight on top of the sandwich to get the “pressed” effect.


Reuben

Corned beef, thinly sliced (thin slicing is the key to the flavor of the sandwich)
Swiss cheese, sliced
Sauerkraut
Thousand Island dressing
Rye bread (I use the rye, pumpernickel combination)
A little melted butter

Because of the “messy” potential of this sandwich, I lightly toast the bread first using a regular toaster. It gives some stability to the structure so it doesn’t fall apart in your hands.

Butter both slices of bread on one side. On the other side of one of the slices, spread some Thousand Island dressing. Layer on the corned beef, sauerkraut and Swiss cheese. I warm up the sauerkraut first so it is hot all the way in the middle without burning the bread. Grill on both sides until golden brown.


Classic Caprese Sandwich

Choice of tomato, medium sliced (there are some beautiful heirloom tomatoes available)
Buffalo Mozzarella cheese, sliced
Basil pesto
Capers
Balsamic vinegar
Olive oil
Sourdough or French bread
Sea salt and pepper to taste

Heat olive oil in a skillet. Add tomatoes and capers and heat just until the tomatoes begin to break down. About 2 minutes. Take off heat. Drizzle with a little balsamic vinegar.

Brush oil on each side of bread. On opposite side spread some basil pesto. Arrange mozzarella and tomato/caper mixture on bread, sprinkle with salt and pepper to taste. Toast sandwiches on both sides.

**************

Check back later for more delicious combinations. Until then, YUMMY YUMMY for your tummy!